How to Create a Community
A community on OpenChat is a dedicated space where users can create their groups, similar to Discord channels. However, unlike traditional platforms, OpenChat is decentralized, meaning it operates on the blockchain, ensuring enhanced security and transparency. Additionally, OpenChat works as a wallet, allowing community owners to receive payments and donations directly within the app.
OpenChat’s communities can be tailored to different needs. Whether you want to create a space for like-minded enthusiasts, a professional group, or even a hub for exclusive content, OpenChat gives you the flexibility to build a thriving environment. The platform’s decentralized nature ensures that no central authority controls your community, giving you and your members more autonomy.
1. Prerequisite:
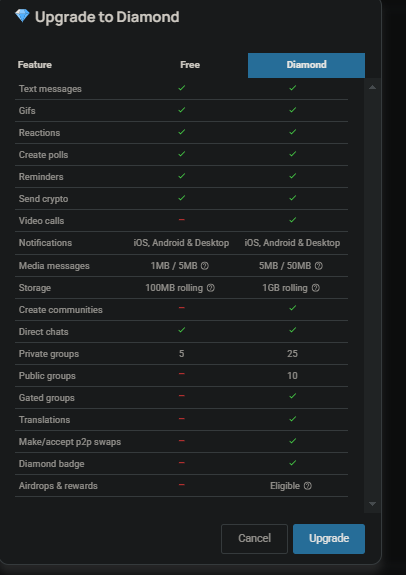
To create a community on OpenChat, you must be a Diamond Member, which requires purchasing a membership. This membership grants you access to exclusive features, including community creation, better visibility, and priority support.
Steps to Create a Community
- Access the Diamond Membership:
- Click on the burger menu in the top-left corner of your OpenChat profile.
Select Diamond. - A pop-up window will appear displaying the perks of Diamond Membership.
- Read through the benefits carefully before proceeding.
2. Choose Your Subscription:
- For this tutorial, we selected the monthly subscription, which costs 3 CHAT. However, you can also purchase a lifetime subscription for just 80 CHAT. Additionally, you can pay in ICP.
- Click Upgrade to confirm your purchase.
3. Create Your Community:
- Navigate to the sidebar on the left and click on the compass icon.
- Select Create Community.
- Before proceeding, consider your community’s purpose. In the next steps, you will set its theme and guidelines.

4. Set Up Your Community:
- Enter the required details, including:
- Community Name (Choose a unique and memorable name)
- Avatar (Profile Picture) (This will represent your community visually)
- Description (Explain the purpose of your community and what members can expect)
- Click Next to proceed.
- You may also add additional features such as pinned messages, announcement sections, and chat moderation tools.
5. Define Visibility Settings
- Choose whether your community will be public or private.
- Public communities allow anyone to join and participate.
- Private communities require an invitation or approval from an admin.
- For this tutorial, we selected private, but if you want broader engagement, the public might be the better option.
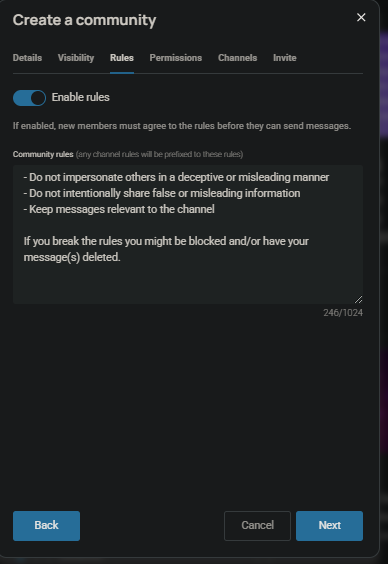
6.Manage Roles and Rules:
- Add administrators to help manage the community. Assigning trusted admins ensures smooth operation.
- Invite members to join by sharing a unique invite link.
- Define community rules (no spam, no offensive content, respect others). Having clear rules helps create a respectful and engaging space.
- Consider setting up moderation bots or guidelines for handling violations.
7.Finalise and Launch:
- Click Publish, and your community will be created.
- If your community is public, people can join freely by searching for it.
- If it is private, you can manually approve or invite members.
- As the administrator, you will receive two badges:
- Administrator Badge (Indicating your role in managing the community)
- Owner Badge (Confirming your status as the founder)
Growing Your Community
Once your community is set up, focus on growing engagement by:
- Posting regular updates: Keep members informed with announcements and pinned messages.
- Encouraging participation: Ask questions, hold discussions, and organise events.
- Moderating effectively: Ensure the rules are followed and maintain a welcoming environment.
- Utilising OpenChat’s features: Accept donations, offer exclusive content, and explore monetization options.
Congratulations! Your OpenChat community is now set up and ready to grow. Engage with members, moderate discussions, and explore the possibilities of a decentralized social space with integrated financial features.
Check our tutorials!
If you want to support us
Subscribe to our YouTube channel Follow us on X